Tuesday, December 20, 2011

Xmas Post :: Designery - Christmas Wreath tutorial


Guest Blogger - Designery

........................................................................................................................................................
.............

This wreath looks great and is really simple to make. I have been meaning to do something with a roll of hessian webbing I have been hoarding and now I have a snazzy new wreath for my front door!! I absolutely love natural colours mixed with red, they look so good! I hope you enjoy the tutorial and...... of course, have a great Christmas and festive season..........with love from Designery xx

This wreath looks great and is really simple to make. I have been meaning to do something with a roll of hessian webbing I have been hoarding and now I have a snazzy new wreath for my front door!! I absolutely love natural colours mixed with red, so this is very much me!


Materials and tools needed:
  • Cane wreath, approx 25cm in diameter (I found mine in an op shop and recycled it for this project)
  • Hessian webbing (approx 5 metres)
  • Hot glue gun
  • Linen ribbon (30-40cm)
  • Scissors


Instructions:

1. Using your hot glue gun, glue an end of your webbing at an angle, on to cane wreath. (Take care not to burn yourself with the hot glue!)


2. Once the glue has set (wait a few minutes for it do do so), you can start wrapping your wreath with the webbing. Wrap on angle. I used a 2cm overlap on each wrap of the webbing. Make sure you wrap quite tightly, or you will end up with lumpy bits on wreath.


3. Continue wrapping the wreath until you have double wrapped it. (I tried a single layer of wrapping, but it looked a bit thin). Snip off the remaining webbing. Using the glue gun, glue the end of the webbing at the rear of wreath.


4. Making the ribbon.
As I am completely hopeless at tying ribbons, I used a bit of a cheats way of getting a nice finish. I took a length of the leftover webbing and made two loops on the left hand side, the back loop slightly bigger than the front one. Now do the same on the other side, using the remaining webbing. Take the leftover end of webbing and wrap around the wreath and centre of your "bow", until it is secure enough to glue at rear of wreath behind the bow.


5. At the rear of the wreath (as pictured below), take a piece of linen ribbon and hot glue both ends to the back of the wreath. Wait a few minutes for glue to dry.


Your wreath is now ready to hang!


Monday, December 19, 2011

Xmas Post :: Idea Liza - All wrapped up in handmade


Guest Blogger - Idea Liza
madeit.com.au/IdeaLiza

.....................................................................................................................................................................


Hopefully by now you’ve got most of your Christmas presents sorted,
but have you wrapped them?


In this post I’ll show how to add some handmade flair to your wrapping paper, by block printing Christmas motifs onto plain paper. I’ve used brown recycled paper, but any plain paper could be used.

First up, you need some stamps. You could use store bought stamps and an ink pad, but you can also easily create your own. To make a stamp, first draw the mirror image of your desired motif onto a material like lino, rubber such as ezycut, or a half potato.

You then need to cut away the material which you don’t want to print (using a sharp knife for a potato, or lino cutting cools for lino or rubber). If you’re using a soft material like lino it can be useful to then glue the material onto a piece of wood, to give the lino more support and create a rigid stamp.


To make a stamp pad, you need a flat surface (something like the inside of a cd case), some paint (acrylic paint is fine), and a piece of absorbent material like felt. Spoon some paint onto your surface, cut a piece of material slightly bigger than the area covered in paint, and place the material over the paint. You’re now ready to start printing.

Xmas Post :: Joyfoolery - Re-usable Fabric Christmas bags


Guest Blogger - Joyfoolery
madeit.com.au/Joyfoolery


.....................................................................................................................................................................

This year I decided to finally make my own bags to wrap the Christmas presents in.


I have wanted to do this for many years, but always found myself too busy (or lacking in desire) to get it done. With four children I knew this would be a mammoth task, but also worthwhile. Here is why I love this idea:

  1. It's eco friendly, lots of energy saved in not buying wrapping paper (especially when you get the fabric second hand from op shops like I managed to).

  2. They look fabulous!

  3. They are reusable. This means I have very little work to do next year! (I really, really like that part).

  4. No filling up the rubbish bin on Boxing Day. I just need to fold the bags and store them away for next year.

  5. Cost. The price of the fabric and my time was the only cost and that was a one off.


Want to make your own? There is still time, these bags are so quick and easy, especially when you make a whole heap at a time like I did. Here's how:

Choose your bag size, you can make your bags any size you want! Start off with your fabric in a square or rectangle shape.


Then fold it in half (right sides of your fabric together).


If you have an overlocker use that to sew together the bottom and one side edges. Or you can use a zigzag stitch on your sewing machine to keep the edges tidy. Stop around 2 inches from the top.


So it should be looking like this:


Now fold those edges back and zigzag them. I should note here, I used white cotton so you could see my stitches, but it would be much nicer if you matched your cotton to your fabric!


If you don't have an overlocker you can skip this next step. I overlocked the top edge.


Now you just need to fold the top edge down to make a casing for your ribbon. If you don't have an overlocker, you will want to use a zigzag stitch or fold the hem under for a neater edge. Fold down around 1.5cm depending on the width of the ribbon that you want to thread through.


That's it, looking good, only one more step now.


You can turn your bag right side out now. Pop a safety pin onto the end of your ribbon (I used bias tape that I picked up in the op shop) and thread it through.


Tie a knot in the ends of your ribbon, and you are done!


Now go and make a whole heap!


No. More than that.


That's better. Merry Christmas!

.....................................................................................................................................................................

Sunday, December 18, 2011

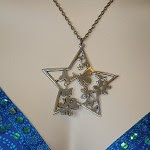
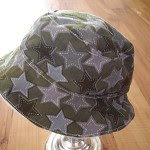
Tupsy Turvy Xmas Gift Guide - Follow the stars


Guest Blogger - Tupsy Turvy

Music for me sparks emotions and it is especially so at Christmas time. I love hearing the carols that play, and join in with singing the words, telling the story of Christmas. I have a simple carol in my memory from Christmases past, as a child participating in a Nativity play, about the three kings following a star. Even many years later I can still remember the words and the tune. Music has that effect.

My favourite carol is ‘O Holy Night’. It not only tells of the Christmas story, but the tune lilts and seems to build in reverence. The carol begins with ‘O Holy night, the stars are brightly shining…’ The ‘star’ is a symbol of Christmas and part of many gifts and decorations at this time of year. I thought I would peruse the lovely handmade items and find some starry products. Follow these stars…


Click the photos below to visit the madeit items.


Saturday, December 17, 2011

enchanted creations by narelle Xmas Gift Guide - The Christmas Tree


Guest Blogger - enchanted creations by narelle madeit.com.au/enchantedcreationsbynarelle

A big part of Christmas for me is the traditions that take place. A tradition I have always loved at this time of year is putting up the Christmas Tree. It has always been a family event. With Christmas carols playing the background and everyone taking turns putting on the decorations, it is a time to relax and just enjoy the moment. The youngest in the family has always had the honour of putting the angel on top. This was how my parents always put up our tree and this is how I have always done it with my children.

So in honour of the Christmas Tree, here are some tree themed items I have found.


Click the photos below to visit the madeit items.


You may also like:

Related Posts with Thumbnails